
Backup management and local network sync with FreeFileSync
Presentation of Freefilesync and how I use the software to synchronize files between multiple computers connected to the same local network and to help in maintaining my offline backups.
As always, a full list of the articles in this blog can be found HERE.
Introduction
This post is the first part of my workflow taking care of preserving the integrity of my data and media files over time.
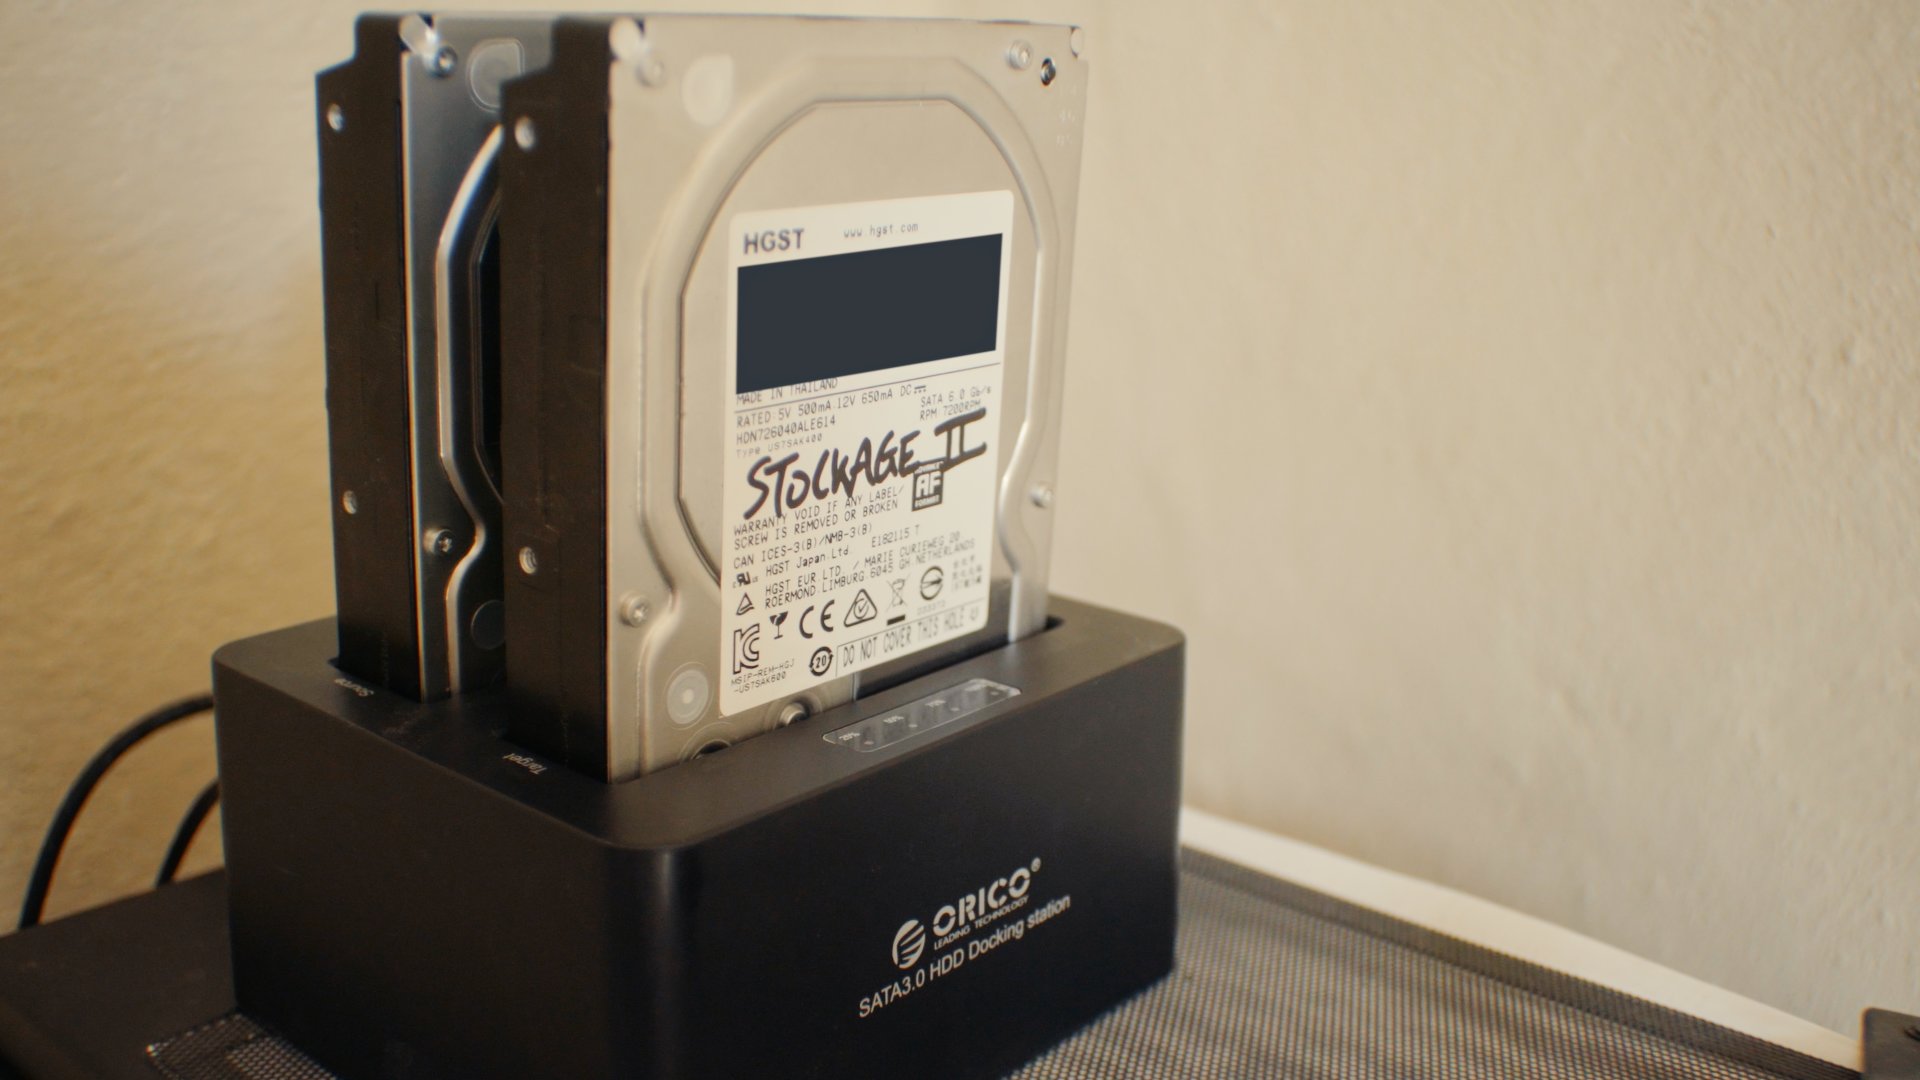
My current method of backup up my data is to have a local work copy on a SSD drive on my desktop and to create two copies on two separates hard drives which are kept disconnected and stored in a safe place. I personally use HGST 4To drives after having read the reliability results from Backblaze’s website, which is a cloud storage company using consumer grade hard drives in their servers (link to the results HERE). They upload each quarter the reliability results from each of their drive pools and HGST always places among the bests in regards to low failure rates. In a low intensity scenario as is mine (the disks are only spun up a couple times a month at best), it’s perhaps not necessary to have the best reliability but it’s certainly a peace of mind and a way to limit risks. For the same reason, I don’t use external drives as I recall having read that the drives used are the ones failing the standards for desktop use and are therefore lower grade and more likely to fail.

The disks are connected to the desktop via a USB 3.0 dock (accepting both 3.5″ and 2.5″ drives) with the capability to access both drives simultaneously (which is a big help to perform backups).
In theory, I should have a third copy of the data on a third drive stored in a separate location from my work, to prevent complete loss of data if a disaster struck my workplace.
I don’t use and trust Cloud storage services, as I don’t want to depend on internet access or on service providers who could interrupt access at any time and without any means of data recovery.
I first started by copy-pasting manually my media files on the two drives, which quicky led to disparities when I deleted old or superfluous files on one drive and not on the other. Have I deleted this folder on the second drive ? Have I replaced this old file with the new on both disks ? This quickly led to headaches.
Rather than clone one drive on the other each time I made changes, which could take several hours or even days to rewrite the entire disk, I tried to find a software solution :
Software presentation
FreefileSync is a free and open source folder comparison and synchronization software (even for commercial use). It’s available on Windows, MacOs and Linux at this LINK. If I only use basic functionalities, the software can also sync to cloud services (like Google Drive) or via FTP client.
Backup to external storage
Freefilesync is a perfect fit for my use : create a mirror copy of one disk to the other by comparing the data on them and only copying the changes, not rewriting the whole disk everytime.
This is how I set it up :
First I created a new config file on FreeFileSync.
I added my source and target disks in the two corresponding boxes then opened the comparaison parameters (F6 or the Gear icon).
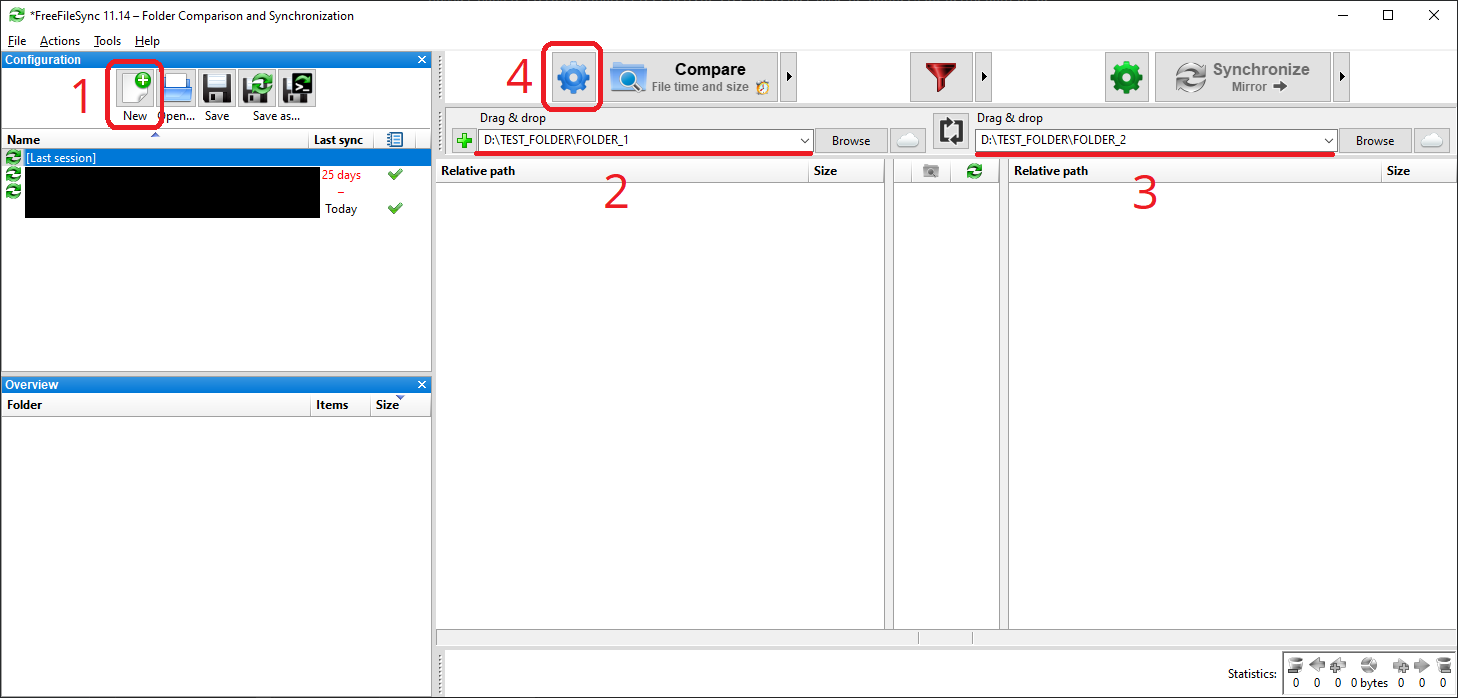
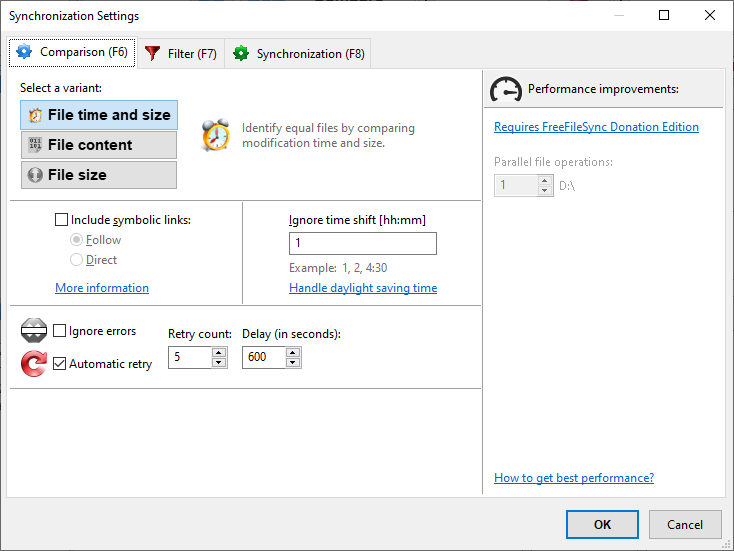
In my case, I chose the « date and file size » comparison method as it’s sufficient.
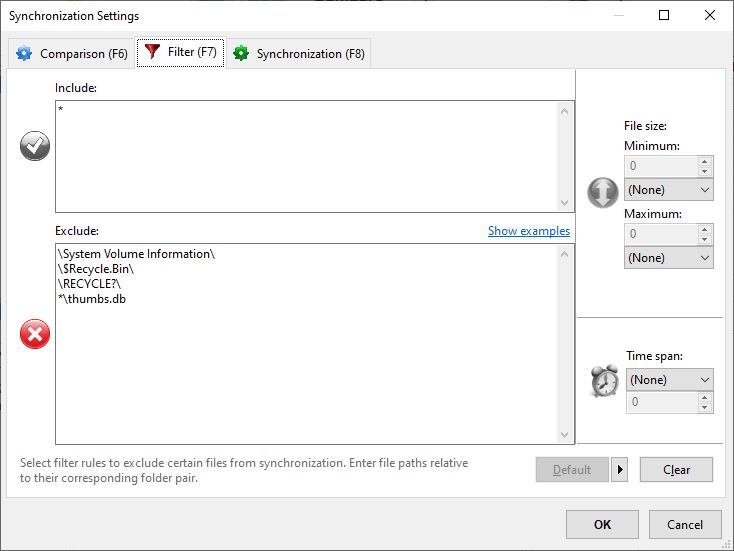
In the second tab « Filters », I didn’t touch the default settings.
In the third tab « Synchronization », I selected « Mirror » to only copy the changes detected between Disk 1 to Disk 2. I also checked « Detect moved files ». This is particularly useful to prevent massive drive rewrites if you just rearranged some folders, especially with some media files exceeding hundreds of Gbs in size. I left the delete option on « Recycle bin », but you can enable versioning to keep older versions of deleted files if you want.

Once the parameters set, you can save it to reuse it later (« Save as ») or start the comparison to see what changes will be copied over (« Compare », F5) before the software start modifying the drives.
All seems correct, so I start the synchronization (« Synchronise », F9)

I now have two drives with identical data on them. I add the new rushes or media on the first disk, delete what is not needed anymore, then start the comparison and the synchronization on FreeFileSync to echo the changes on the second drive.
Backing up, synchronizing data between two computers on the local network.
Being on the move a lot, I have a laptop so I can work away from my main workstation. I soon had trouble keeping my work files up to date between the two computers. Still against the idea of using a Cloud service (even moreso for sensitive work files), I configured FreeFileSync to automatically and effortlessly sync my data between the two when they are connected to the same local network.
Setting up the Network Share on computer 1 and connecting to it from computer 2
I first had to create a network share on my work computer, which will serve as an exchange folder between the two computers.
The following photos will unfortunalty be in French but the written tutorial should contain the correct translations.
To do this, select the folder you want to share, right-click then « Give access to » then « Specific users ».
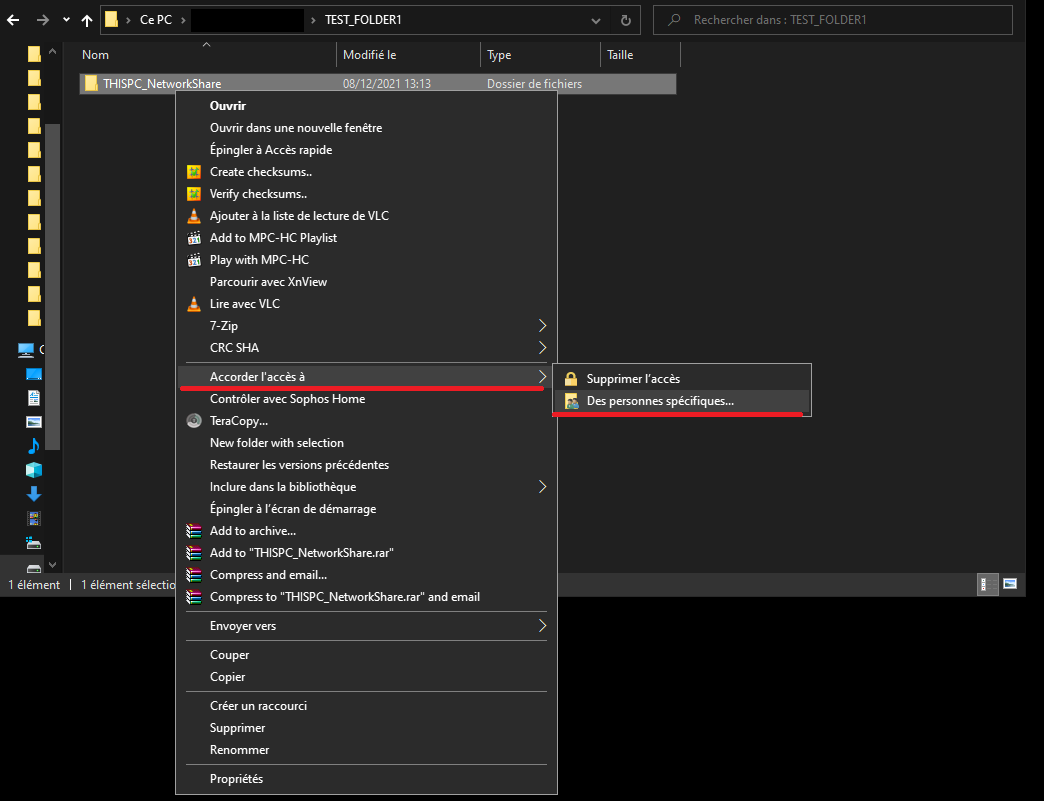
In the window that opens, select specific users or « Everyone » depending on your use then « Share ».

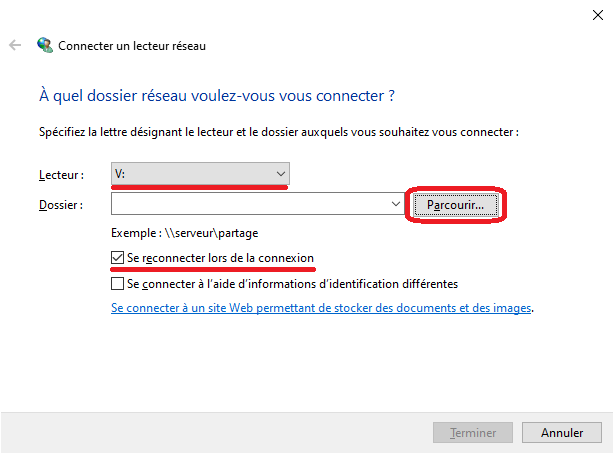
On the other computer, open an Explorer window and go to « My PC », on the « Computer » tab, select « Connect a network share ». In the window that opens, select the drive letter that you want then find the network share by clicking « Browse » (the network discovery can take some time). Write down the name of the folder somewhere before exiting, which should look something like « \\PCNAME\NetworkShareFolderName ».

Setup on computer 1
It is now time to synchronize the work folder with the network share folder (this way I have two copies of my data on two different drives in case one goes bad). The setup is a little more complicated to make the whole process automated : it uses the RealTimeSync function of FreeFileSync, which can detect changes in real time and synchronize in the background without user interaction.
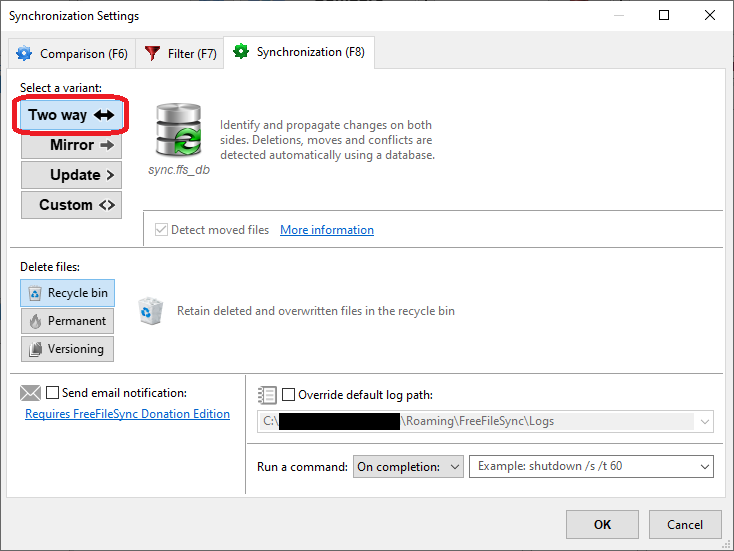
On FreeFileSync, I redo all the setup described above, but instead of choosing « Mirror » in the comparison settings, I use « Two Way ». The software will reflect the changes whether they come from the local folder or from the folder in the network share. It also creates a database file to keep track of what has been modified, deleted or moved and keep everything consistent.
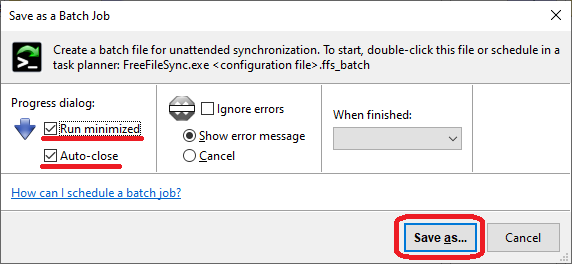
Now, instead of simply saving the configuration, we must use the « Save as a command file » option.

In the window that opens, select « Run minimized » and « Auto-close » so that the software doesn’t create a new window each time a file is modified in the watched folders and everything runs in the background.
The saved file will be in .ffs_batch format. If launched as is, it will open Freefilesync but we want to use the RealTimeSync function. To do this, open the RealTimeSync.exe utility present in the FreeFileSync installation folder. In the window that opens, import the .ffs_batch file created previously using File > Open. The utility loads the configuration and all you have to do is save it with Files > Save as with the .ffs_real extension.
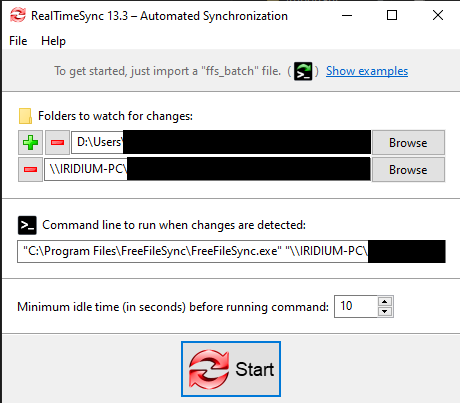
By clicking “Start”, the service will be visible in the taskbar and will actively monitor any changes to the folders saved in the script.

Creating a task with Windows Task Scheduler
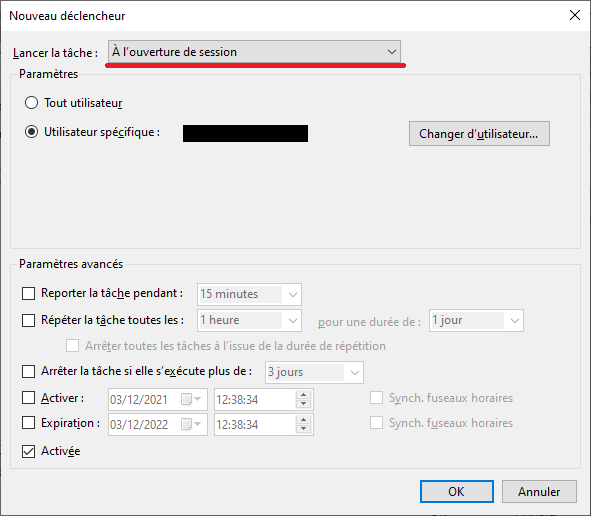
The problem is that each time your computer will reset/shut down or your session is closed, the script will have to be launched again. To do this automatically, we will have to use the Windows task scheduler : type in the Windows Search bar « task scheduler » and open it.
In the right window, select « Create task… ». In the window that opens, choose a name for your task and select « Run with highest privileges » to prevent conflicts. Verify that the settings for « Configure for : » is on Windows 10.


Go to the « Triggers » tab. In « Begin the task », select « At startup ». The Freefilesync documentation uses « On workstation unlock » but the task wasn’t always launched on my machine, with « at startup » I haven’t had any issues.

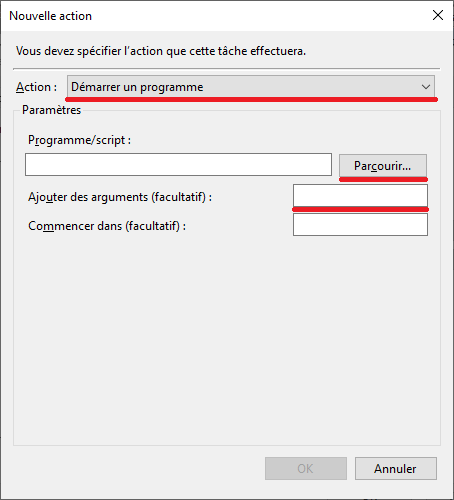
In the « Actions » tab, click « New » and in the window that opens, choose « Start a program ». In the « Program/script » field, click Browse and go to your Freefilesync install folder and select RealTimeSync.exe. In the « Add arguments » field, copy the path to your .ffs_real config file.

Test if the service launches by restarting the computer.
Setup of computer 2
On the other computer, redo the process to create a script in Freefilesync between the local folder and the network share folder. As it is connected through the network, it’s best to use the network name of the folder and not the drive letter you’ve mapped it to. For example, use « \\PCNAME\NetworkShareFolderName » (the folder name you’ve wrote down above) instead of « V : ».
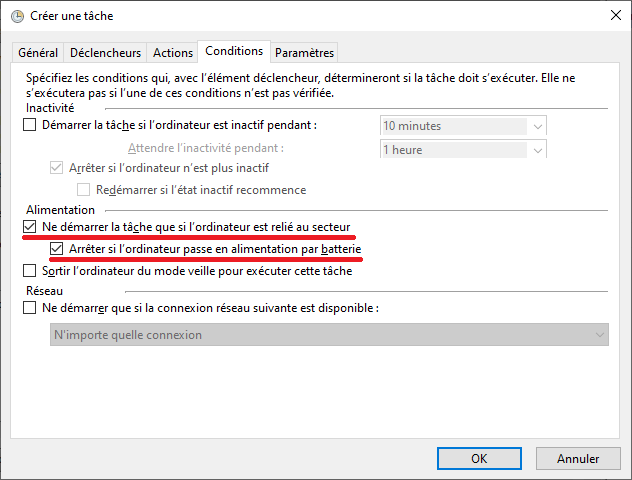
Just as above, save the config as a .ffs_batch, then open the RealTimeSync utility, import the .ffs_batch file then save it as a .ffs_real file then create a task in Windows Task Scheduler. A warning, if this computer is a laptop, during the task creation, go to the « Conditions » tab and uncheck « Start the task only if the computer is on AC power » and « Stop if the computer switches to battery power », otherwise the sync will not work on battery power.
I had to go an extra step so that RealTimeSync could access the network share drive. I don’t know why, but windows wouldn’t let the service access the folder unless I had manually navigated to it via an elevated explorer window, even after changing the permissions… To make it easy, I created on my desktop a .bat file with « run as administrator » checked that opens the networkshare drive with explorer then exits the window :
explorer \\PCNAME\NetworkShareFolderName
taskkill /im explorer.exe
exit
Conclusion
Freefilesync allows me to automatically manage the various additions / deletions of files and data and to reflect these changes on all my backups. It also aids in synchronizing my work files between my different computers. However, nothing guarantees the integrity of this data and it is not possible to know if it has been deteriorated by time or during a transfer, with a disk sector becoming corrupted for example. The next part will therefore focus on ensuring the sustainability of these data by generating and verifying checksums.