
A presentation of alternative softwares
I am going to present in this article my photo and video editing workflow which does not use any of the Adobe software suite. I’m personally a fan of their pricing strategy so I tried to find worthy alternatives.
First, a warning: this workflow works for my specific case as I tailored it for my use, therefore it cannot fit every videographer’s or photographer’s needs. For example, I never do local retouching of my photos, so I have no use of the tools found in a software like Photoshop. But I thought it was still interesting to share it.
I edit my photos in DaVinci Resolve, which is first and foremost a video editing and color grading software. I explain why I use it here, and how to edit Raw files in Resolve in this article. So keep in mind that this is not a normal workflow that will be presented below.
As always, a full list of the articles in this blog can be found HERE.
This way of working maybe isn’t the best and I don’t claim its superiority compared to what Adobe offers, but this is the easiest and quickest way to work I found.
First, I’m going to present the video workflow, then in a second part the photo editing workflow.
Video Workflow
Editing, post-production and export: DaVinci Resolve (300$, free version)
DaVinci Resolve is a professionnal NLE equipped with all the functionalities and tools necessary to video post-production. The free version is identical to the paid one, with some limitations like not being able to render at more than 4K (3840×2140), the absence of noise reduction options and OFX plugins.
This is what the software allows me to do:
- Import : import all my rushes and pre-organize them in bins inside of Resolve.
- Derushing : further organize the rushes by adding metadata and keywords manually. It will then be possible to create Smart bins for specific keywords or combination of parameters, like resolution of the footage, framerate, scene, actors present, etc… All of that are really helpful to speed up the derush phase.
- Editing : DaVinci Resolve has really worked on its editing tools and is now a full-fledged NLE. Premiere users might be disconcerted at first by the differences of the interfaces, but Resolve can be configured to the Premiere shortcut keys. I think that with a bit of training, both software are as quick to use as the other one.
- Audio mixing : I’m only starting to get into audio mixing, but with the integration of Fairlight, Resolve has all the basic tools covered like noise reduction, equalizers and other filters. This is largely enough for my use.
- VFX, Animations, Titles : Fusion is the other software integrated into Resolve since a few versions. This is where the differences with a program like After Effects are the most showing. If AE works like Photoshop and use layers, Fusion works with nodes just like Nuke. The motion design tools are also really basic and are clearly inferior to those found in After Effects. But for heavy compositing, green screen work and 3d integration, Fusion is at least equal to the Adobe equivalent. For example, the thumbnail of this article was created inside of Fusion.
- Color correcting and grading : this is what first got me into Resolve during my studies. Here, Premiere, even with Lumetri, doesn’t hold a candle to the number and power of the tools found in Resolve. This is also where the difference between the free and paid version of DaVinci Resolve is most seen, as noise reduction (both spatial and temporal), OFX plugins (with effects like Film grain, Lens Reflections, etc…) are locked out. But in my case, the choice was quickly made, with Premiere available for 24€/month, Resolve started to save me money in a little more than a year…
- Export of Master video file : the export tab of Resolve is still really basic and the H264/H265 encoders are too simplistic. No real way to adjust finally the bitrate and the quality parameters. This is why I always only export a Master file in .mxf at 10bit. In the paid version, there is also the possibility to create .dcp, which are quite useful if you want to screen your project at festivals. If I want to encode the video for sharing online, I will use HandBrake as detailed below.
VFX alternative: Blender (free)
If Fusion is good at compositing, its 3D lighting engine is basic and shouldn’t be used for any serious work. This is why I’m learning to use Blender. I’m only a beginner here, but I quickly managed to export a sequence from Resolve, use the Camera Tracking and Solving tools of Blender (which I found superior to the ones in Fusion, as they are have more parameters manually adjustable in case the tracking goes wrong).
I then watched tutorials to create 3D elements, light them and render them in a photorealistic fashion with the Cycles engine. Then I exported back the sequence to Resolve and composited it on top of the footage.
Encoding: Handbrake (free)
The Master file that I exported from Resolve is usually cloned on my back-up hard drives for archiving, but it is way too big to be uploaded online. HandBrake allows me to reduce the file size to something manageable without too much loss in image quality. For now, I’m using the H265 codec in 10bit to upload to Vimeo or Youtube, as it has really nice image quality for a relatively low file size. HandBrake allows the customization of nearly every parameter of the encoder, so you can really fine tune the encoding to your source files and intent. You can choose speed of encoding other file size or image quality, and vice-versa. Most hardware encoder are also present, like Intel Quicksync and Nvidia NVENC.
In my case, I only have to drag and drop the source file in the HandBrake window, select one of my presets depending on the resolution of the footage, then start the encoding. The resulting file will also be renamed with the addition of the rendering date, to help with archiving later.
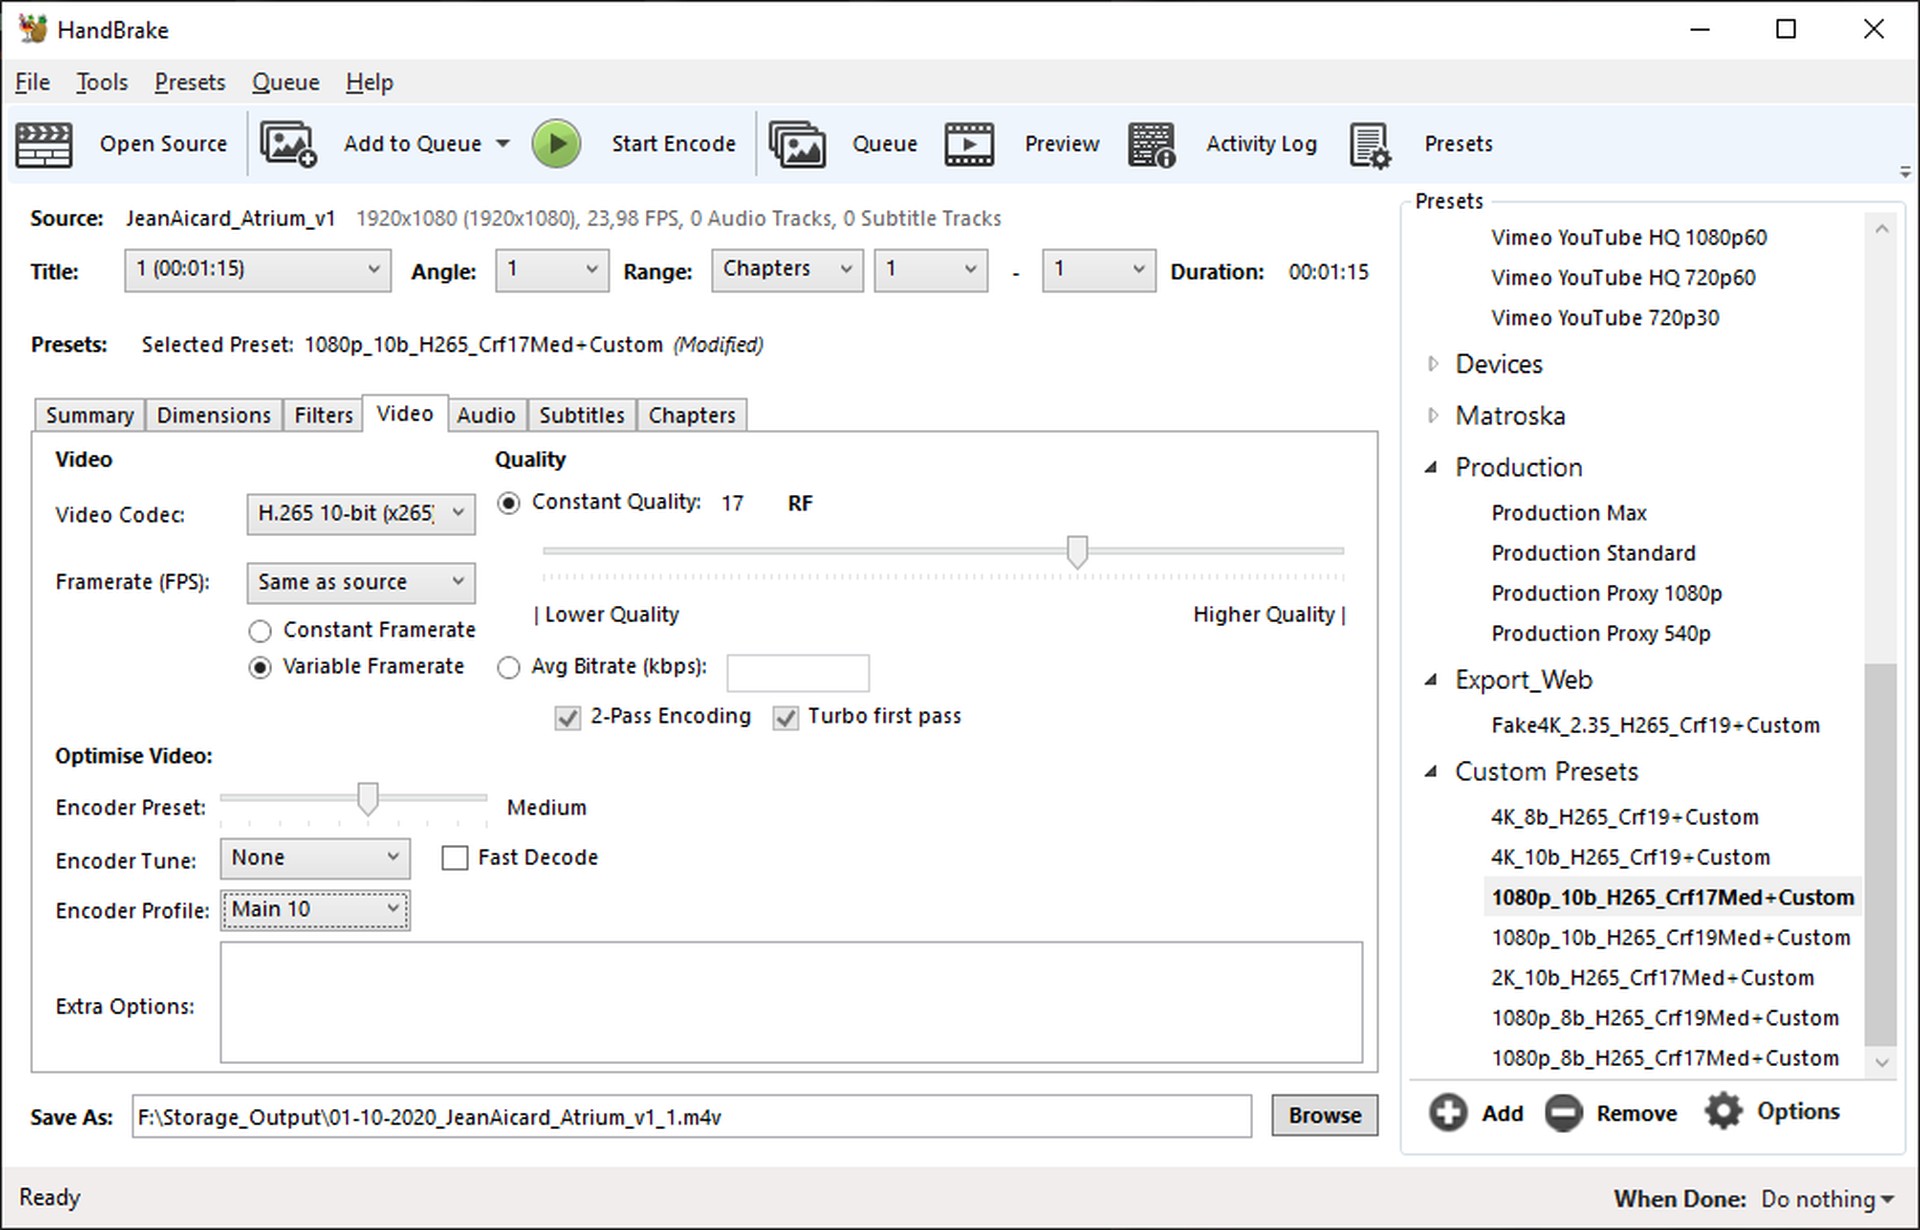
Photo editing Workflow
RAW transcoding : Capture One Express (Free for sony camera owners)
I take my photos in two different manners, either by shooting short video clips, or if I need every last bit of image quality and dynamic range, in RAW. DaVinci Resolve cannot read these files directly, so I need to transform them in something than can be imported. I personally use the .tiff format as I can resize the files in Capture One, allowing me to save hard drive space.
I already wrote an article about this workflow so I’ll just link it here if that interests you.
Editing, .png export: DaVinci Resolve (300€, free version)
If Resolve is not designed as a photo editing software, with a few options and workarounds you can easily import them individually, edit them then export them in either RAW format or non-compressed .pngs. Here again, if you want to know how, the article linked above explains it all.
The upside of doing this is being able to use all of Resolve color grading tools, which even in photo are superior to the ones found in Lightroom. But if you need correction profiles for your lenses or aberrations, Resolve won’t be of help to you. I never use them, so it’s not a problem for me.
Transcoding, compression, watermarking : XnConvert (free)
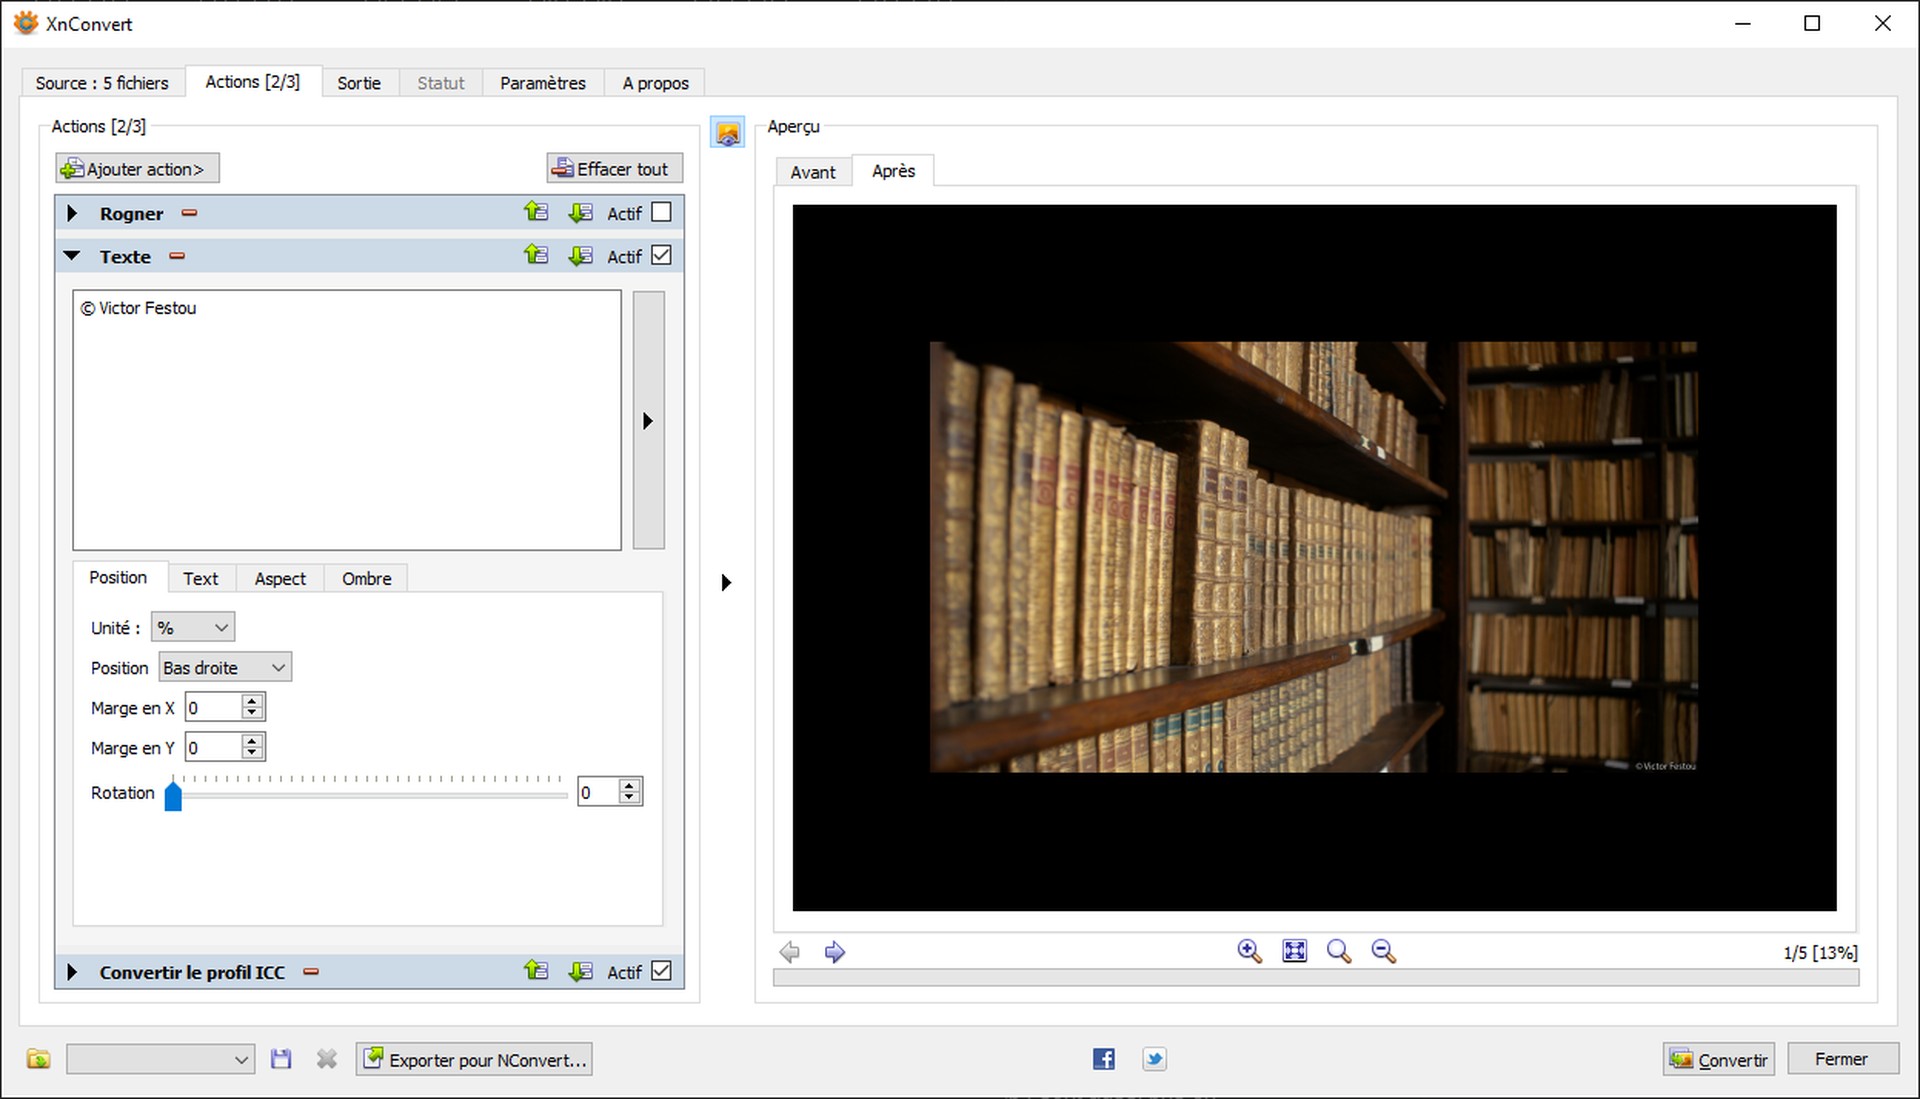
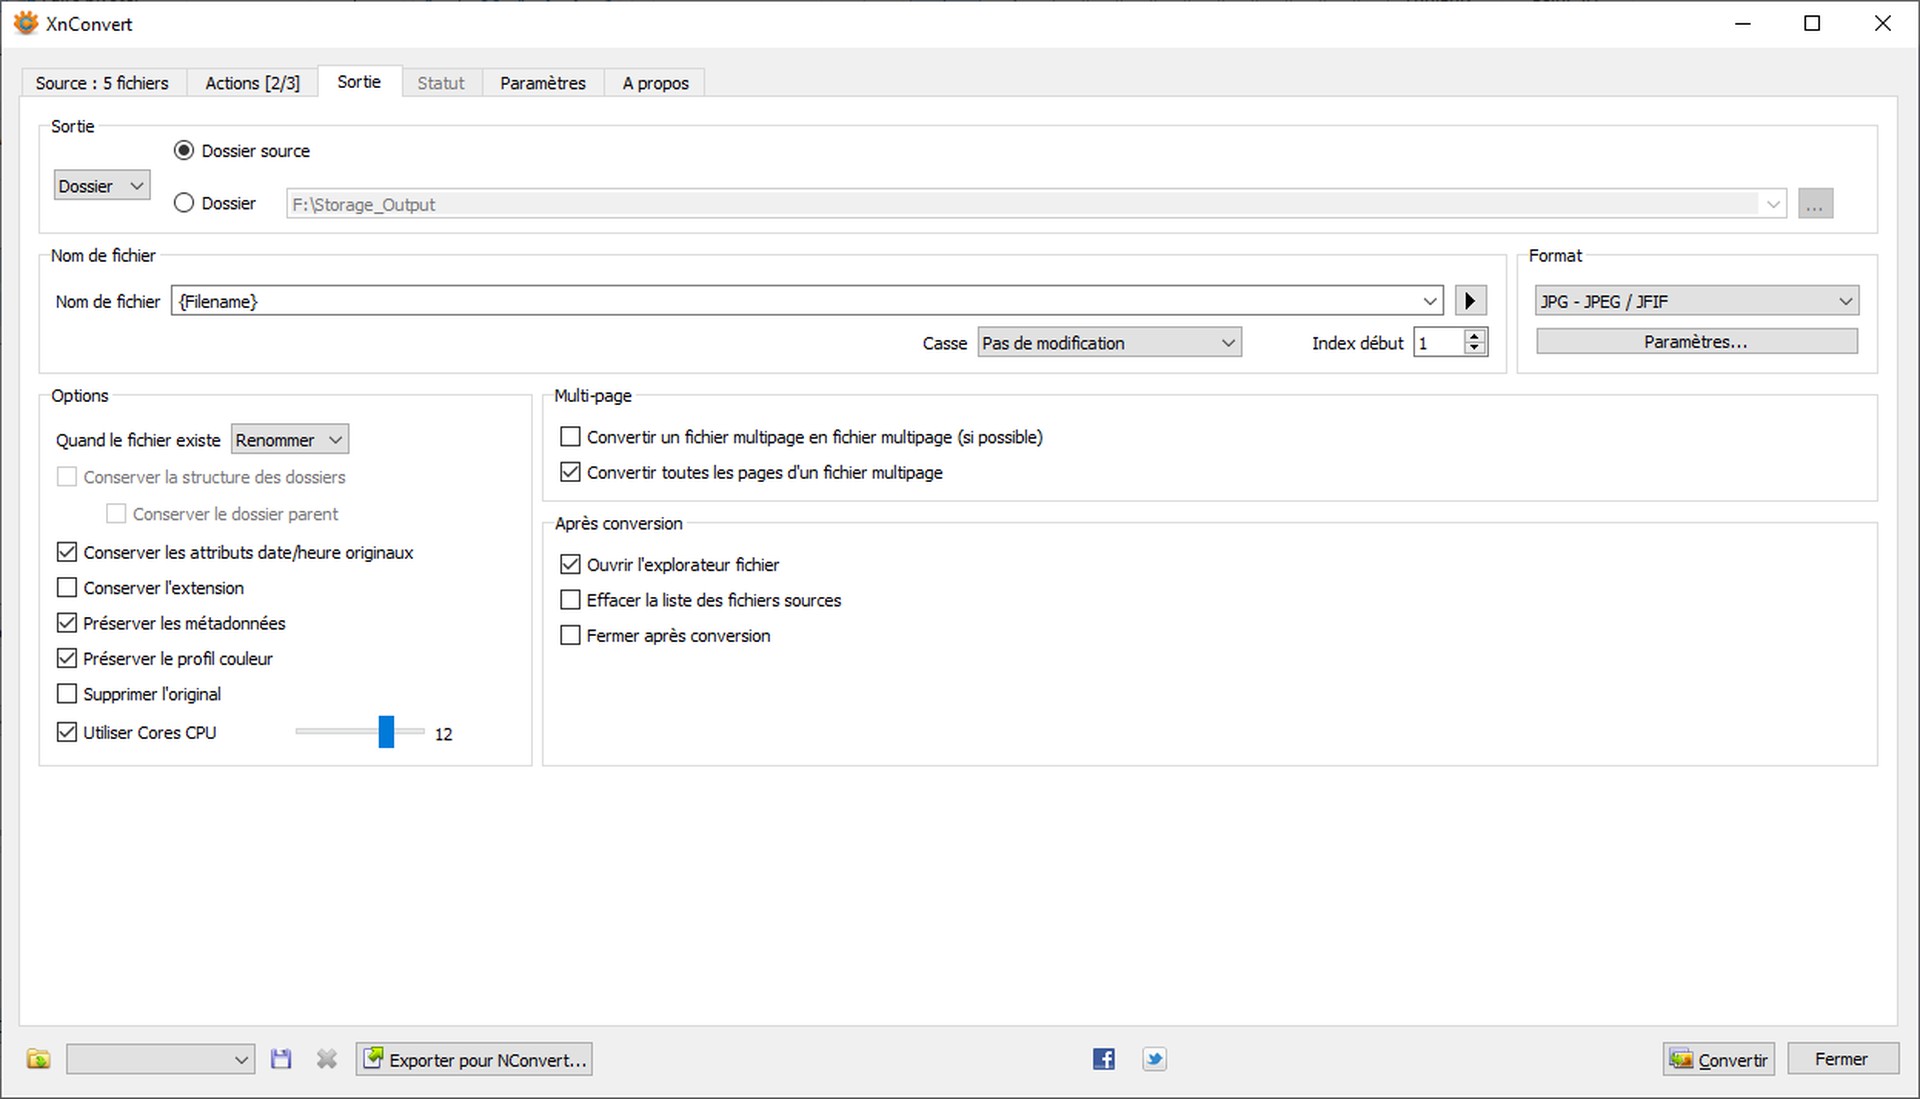
Resolve can output .jpeg files but there is no compression setting, so the resulting files are really large and not suited for long term storage or uploading online. I tried to found a software that could batch convert the .png to .jpeg with a lot of customization and tools, like the possibility to add a watermark for example, and XnConvert fitted perfectly. As it can use all the cores in your system, even with hundreds of files the conversion process is really quick.
In my case, I just drag and drop the files in the XnConvert window, where all my parameters are already loaded, and just need to press Convert. If I need to add a watermark, I can just check a box and it will be added automatically. It can’t get much quicker than this.
Backup and organizing: Photomove Pro 2.5 (9$, free version)
I use to 4To hard drives to archive my previous projects, backup the rushes of the ones I’m working on and keep safe my personal photos and videos. The data on the two disks is identical to not lose anything in case one breaks down.
The help the archiving process, when I first export my photos from DaVinci Resolve, I name them with a combination of keywords, like which people are in the picture, where it was taken, the mood, the time of the year. I’m also now adding the name of the lens. For example, after an urbex session in an abandoned castle shot with a Zeiss Jena 20mm lens, the files will be called “UrbexCastleLocationPostapoZeissJena20.jpeg”. It is of course important not to do any typos as it will hinder the search engine.
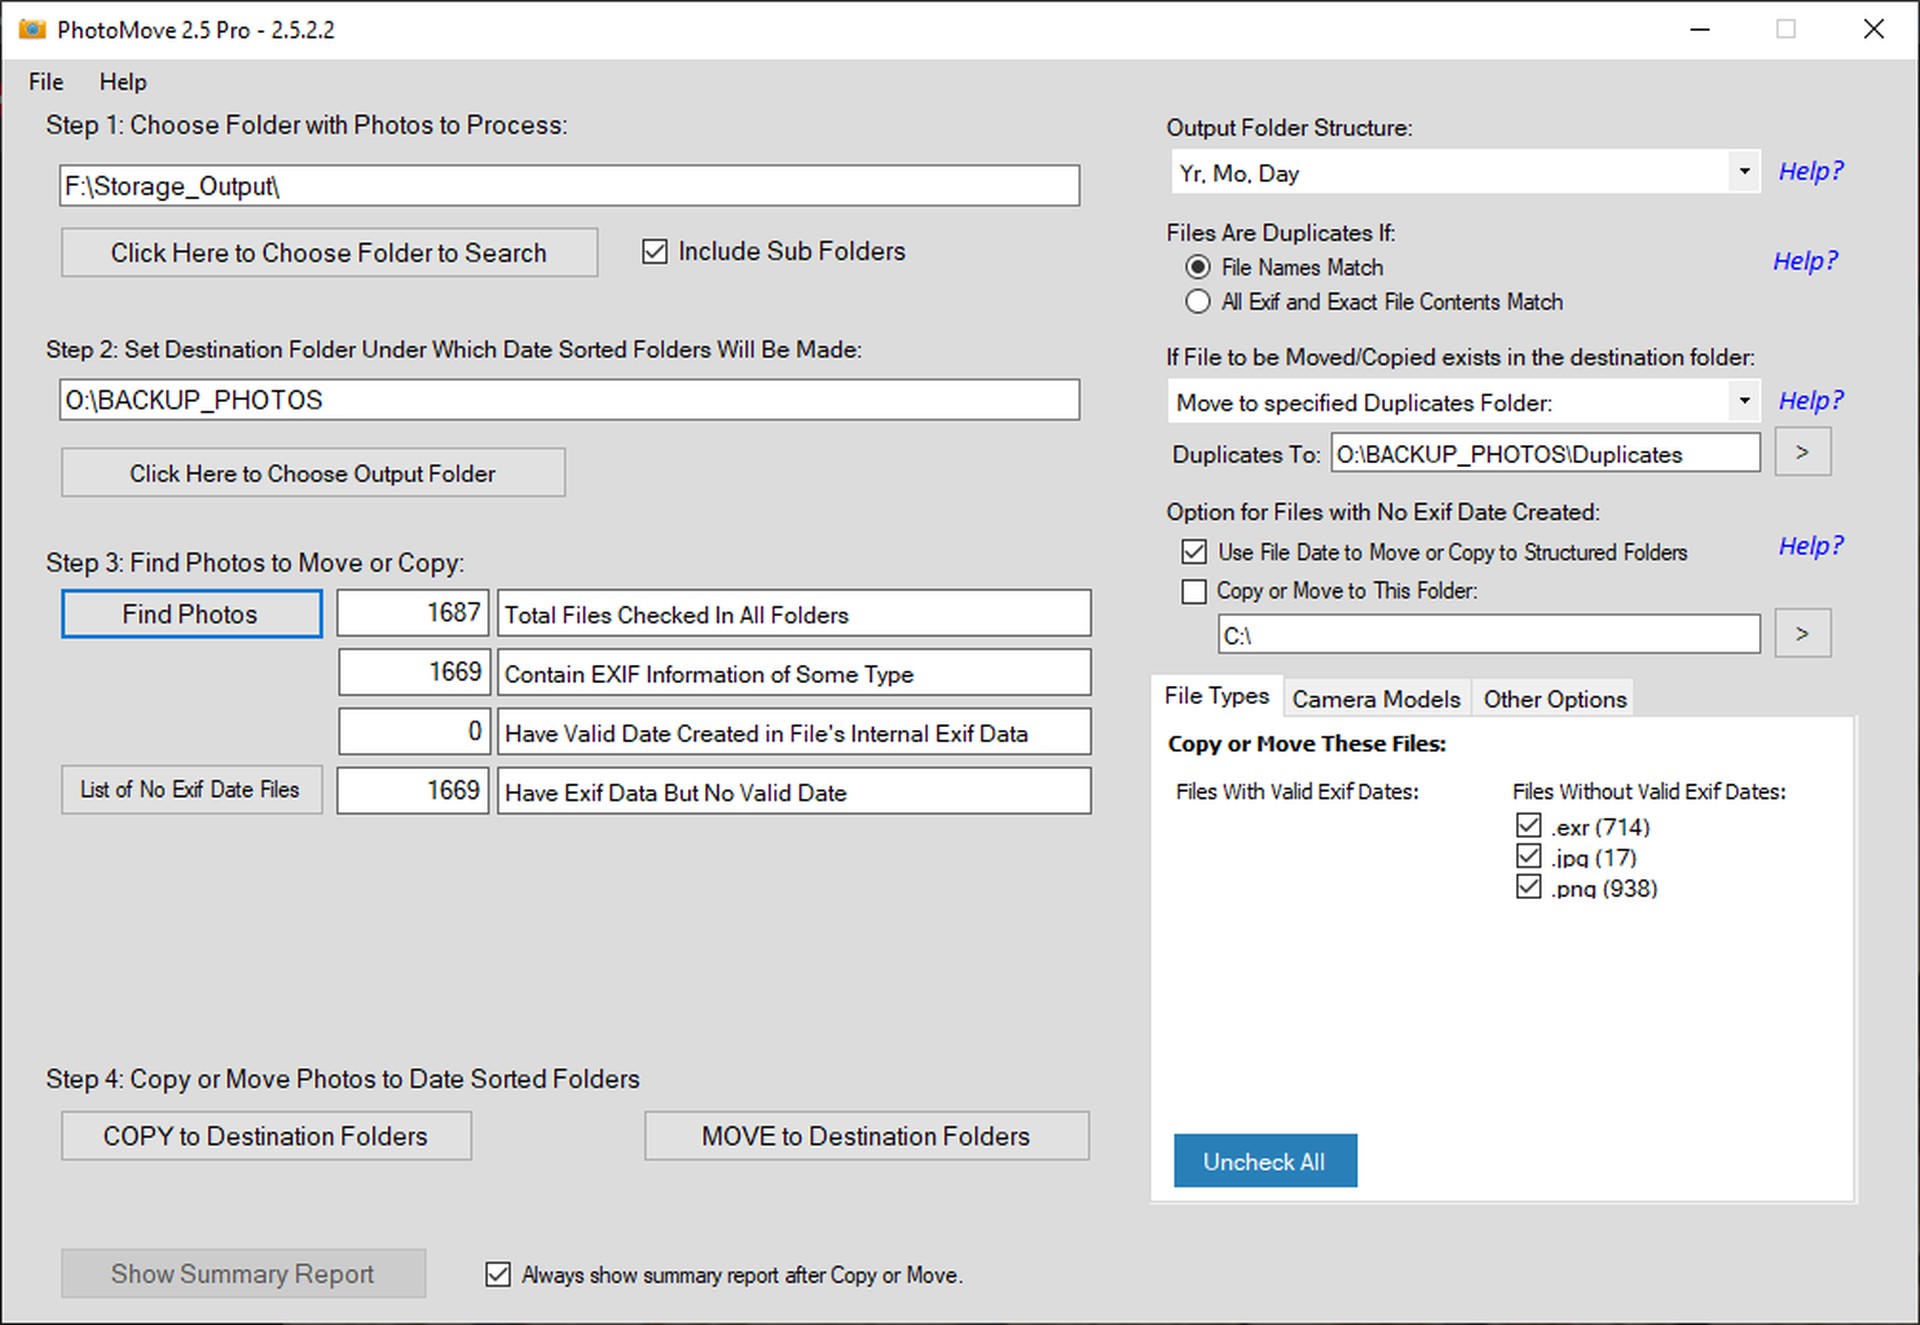
Now I need to organize them by date into folders, and that’s where PhotoMove Pro 2.5 has been really useful. After scanning my export folder, I can select which file extensions are sorted (the software also works on common video format like .mp4, .avi). Then PhotoMove will automatically arrange each files in a folder structure sorted by year, month and then days.
As Resolve doesn’t keep all EXIF data, the exported files won’t have the capture date still in them, but Photomove can use the file creation date instead. It is for sure not the most accurate but in most cases will be enough as I always process each session in one go.
The last action I need to take is to add to the name of the folder, which is just a date, keywords for quick searching. If I need to find all the photos of a specific urbex session in that particular town, I will only need to search (*urbex* *townname*). The (parentheses) are needed so that windows find all the search terms in any order, and the *asterisks* so that it can find the words even in a concatenated character string. Using my example from above again, “UrbexCastleLocationPostapoZeissJena20.jpeg”, if I only search for “castle”, there won’t be any return as there is no space between the words. Typing *urbex* instead will work just fine.
Then I clone the organized folders into my hard drives and I’m all set to prevent data loss.
Conclusion
So this is what my workflows look like at the moment. I had to dig and search a bit to find softwares that filled all my needs but I now have a viable alternative to the Adobe suite which also has the advantage of not requiring any monthly payments. I encourage you to at least give a go at these programs as only a little training is required to get a hang on them and find if they are suitable or not to your own work.