
CHECKSUM CREATION AND VERIFICATION IN WINDOWS WITH Hashcheck, DaVinci Resolve and Corz’s Checksum.
A presentation of 3 checksum creation and verification tools for 3 different uses: ingesting media from external drives, managing frequently modified folders or files and sending data with third-party verification.
As always, a full list of the articles in this blog can be found HERE.
Introduction
In the first part, I presented how I managed my different backups and made sure to keep several copies of my working files to prevent any loss of data. This way, if one of my hard drives were to fail, two copies would still exist on independent drives. But there is always the risk of data corruption: what happens if a sector of the disk becomes corrupt and a large video rush becomes unusable? That a cosmic ray transforms a “0” into a “1” and changes sensitive information? (like the result of an election in Belgium in 2003)
How can we ensure that data written several years ago is still the same today? This is why checksums become necessary to monitor the data and detect any unwanted changes.
According to Wikipedia, a checksum is: “a short sequence of digital data calculated from a larger block of data (for example a file or message)”. Most of the time, this sequence is a sequence of characters in hexadecimal format called a “hash”. Several algorithms exist and vary in complexity, allowing greater or lesser resistance to collision problems (when two different files have the same hash and therefore appear identical during verification).
Be careful however, a checksum is only useful from the moment it is generated upon the ingestion of new media or the creation of new files, because it can only detect changes to the file if they occur between the moment of creation of the hash and the verification time. Thus, if we create today the hash of a several years old file that has been copied and transferred to several different media, there will be no way of knowing if the data is still the same as when it was created. or if it is already corrupted.
Similarly, a checksum can only detect a corrupted file, but not repair it. This is why it is also necessary to have several copies of the same file on different storage media to ensure that you have a viable and intact replacement.
The goal here is to be able to easily generate hashes of working files to ensure that no corruption appears, but also to allow the recipient of a file download (transferring rushes via the internet for example) to easily verify the integrity of what he has received.
I will present here three solutions which complement each other in their functionalities and their uses.
Checksums in Davinci Resolve : clone tool
First, I will introduce the clone tool built into Davinci Resolve editing software.
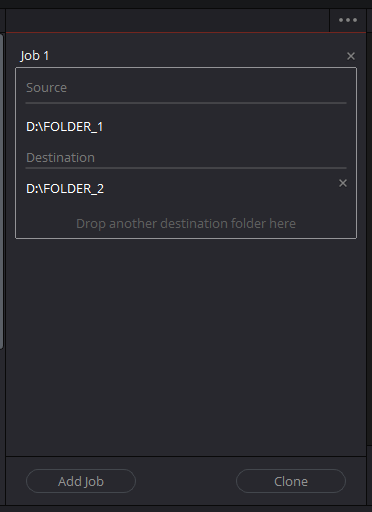
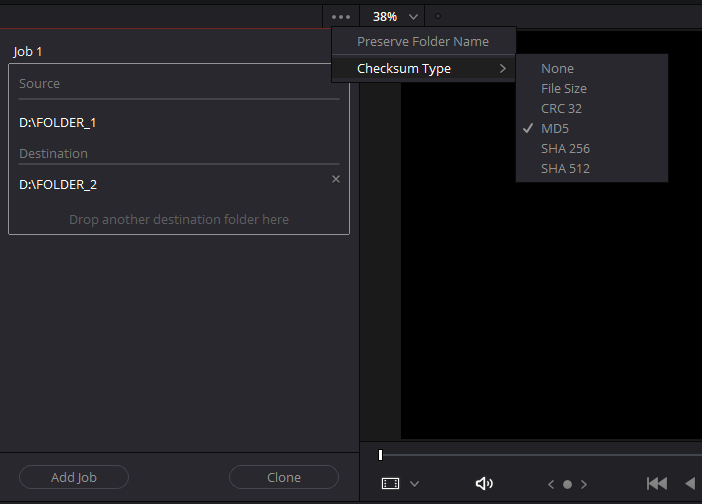
It is available in the “Media” window of the software, in the “Clone Tool” tab and allows you to clone folders to as many destinations as you want.However, it is not possible to select individual files.Several hash algorithms are available and md5 is selected by default.

I prefer to use SHA-512, which is safer if more complex, because the additional time to compute the checksum will be negligible* (*more details in the “Performance” section) compared to reading and writing large files like rushes or videos, even on flash storage.
Be aware that cloning media with verification will take longer than just copying the files. Rather than simply reading the source file and writing it to the destination, the software will read the source file, generate a checksum (which takes negligible time today), write it to the destination and then read and compute a new checksum before comparing the two to verify their correspondence. It is this second reading that considerably lengthens the total time of the operation.
This method is therefore the most useful for ingesting large amounts of media, for example to copy all files from a memory card or from a SSD to an external recorder.But the tool is still very simple.It cannot handle individual files and does not provide any additional information if cloning fails. A “Failed” message will just be displayed, but no log will specify which file is the source of the problem, so you will have to start the cloning again from the beginning.I personally have had errors very rarely, when using questionable external drives for example, but the fault was not with the software
Another problem, it is not possible to just generate the hashes and skip the verification step to do it later at a more convenient time. In situations where media needs to be unloaded quickly, the substantial time required for verification can be prohibitive.
Local Files Checksums with Corz’s Checksum
I looked for a more flexible tool and came across the Checksum software on corz.org (website link). It is a smart checksum management software with a free version and a very affordable professional license (perpetual license for $10 per installation workstation)
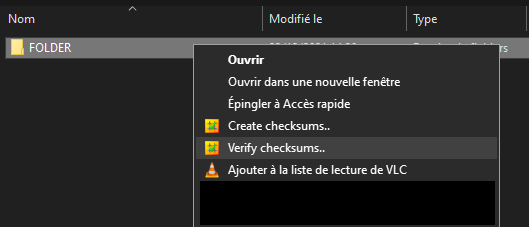
The software does not create an icon because it is accessed through the Windows context menu.All you have to do is select the folder or file for which you want to create a hash, then right-click>”Create checksums”. The hash generation will automatically launch with the default settings specified in the checksum.ini file. To modify this file: during the hash operation, right-click in the status bar then “Edit prefs (Checksum.ini)”. It will then be opened in the notepad.All settings are very well documented and explained, so anyone can easily customize the software to their needs.

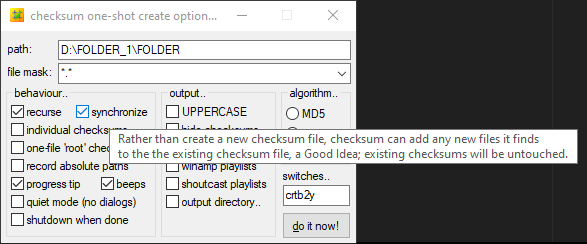
If you want to change the settings on a case-by-case basis, you can hold down “Shift” when clicking “Create checksums” or “Verify checksums” in the context menu.A window will open, allowing you to check the necessary settings.Each box has a tooltip detailing the option.
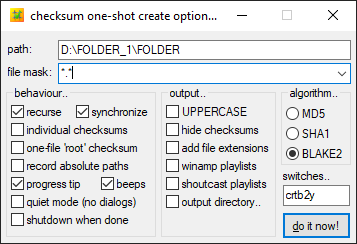
Checksum creation options
Here are the settings I use:
- Recurse : allows you to scan all subfolders of the parent folder.Required when hashing entire volumes or disks so that no files are missed
- Synchronise : the software will not create a new hash file for each scan but will consolidate the new hashes into a single file.
- I use the default mode which creates one .hash file per folder and subfolder. That way, if I only want to check a subfolder on a disk, I won't need to scan the whole thing but only the part concerned.
However, we can see that it is possible to create a separate .hash file for each individual file or a single file for all folders/subfolders (one-file “root” checksum). - I use the Blake2 algorithm, which offers a level of safety similar to SHA-512 while being faster.
If we rehash a folder in which there are already .hash files (for example after adding new files to a working folder that has already been hashed), the software will only calculate the checksums for the new files and bypass all the existing ones, which saves a lot of time especially with large files.
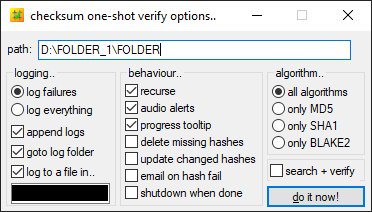
Checksum verification options
For verification, here are my settings:
- Recurse : as with checksum creation I want to be able to check all the subfolders of a parent folder.
And on a case-by-case basis:
- Delete missing hashes : in a work folder, files that are no longer needed are often deleted. This option allows you to delete the hashes of these deleted files to avoid errors during the verification.
- Update changed hashes : this is not a useful option in the case of rushes (there should be no modification and we want to detect any change or corruption). However, if some hashed files are regularly modified, the software will compare the last modification date of the file with the one entered in the .hash file when creating the checksum. If it is different, then the software will generate a new one to replace the one that has become obsolete. This is an option to be used with caution as you cannot tell what changes have been made to the file or by whom.
Observations
Corz’s Checksum is extremely versatile and convenient to use, allowing checksums to be generated for entire volumes with just a few clicks. If new files are added often, Checksum will only recalculate the new sums, instead of hashing the entire folder each time. During verification, the fact that the software generates a .hash file in each folder and subfolders allows only part of the folder tree to be verified. If I had to use HashCheck (shown below) in a similar manner, I would either have to check the entire tree each time or manually create a file for each folder and subfolder. But no solution is perfect and here are the negatives I noted:
- First of all the software is quite old, not having been updated since 2016. I am not sure if it is compatible with Windows 11 although it shouldn’t be a problem.
- There are not many hashing options: only three algorithms, 2 of which are obsolescent (md5 and SHA1) while blake2 is rarely used compared to SHA-256 and SHA-512.
This limits its use in the case of sending data to another machine, unless it also has the software installed to interpret .hash files or blake2 hashes. - The software will only use a single thread in hashing and verifying and will be limited by the single core performance of the processor, 585MB/s during hashing in my case (more details in the Performance section). The only way to achieve the maximum read speed of an M.2 SSD will be to use another software, like turboSFV with the algorithms of the blake3 family, which can use multiple cores (since the v9.2 update of December 2021). With this setup, I was able to achieve 3.8Gb/s hashing using 8 threads.
In turboSFV on the other hand, I did not find any option to recalculate only the hashes of files that do not possess one. The software will generate new hashes for all the files each time. The software also does not have a free version unlike Checksum.
Creation of checksums for sending data with HashCheck
Resolve’s cloning tool is very limited as we have seen, and Corz’s Checksum uses an uncommon algorithm. If you want to send data to a recipient, chances are they can’t verify Blake2 sums, unlike more popular formats like SHA-512.But here is an alternative for this use:
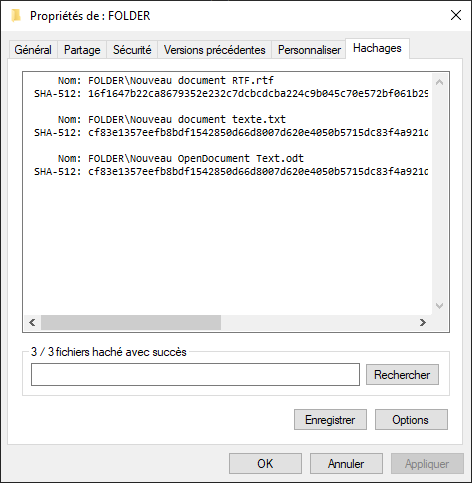
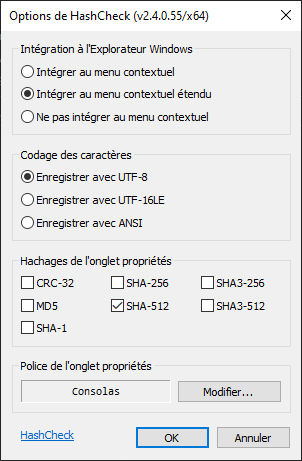
HashCheck is the last program featured in this article, allowing you to add a “Checksums” tab in the Windows “Properties” window for any document or folder. It is available at this address: website link. It allows the use of the most common algorithms, such as CRC32, MD5, SHA-256 and SHA-512.
As soon as the tab is opened, the generation of hashes will start automatically according to the chosen parameters. At the end, you just have to save the file in the folder of your choice. Be careful, however, if the hash file is moved, the verification will no longer work because the written paths to the files are relative!
To check the folder, just double-click on the corresponding hash file and the operation will start. Note that this operation is multithreaded and allows very fast disks such as PCIe SSDs to be read saturated (more information in the Performance section below).
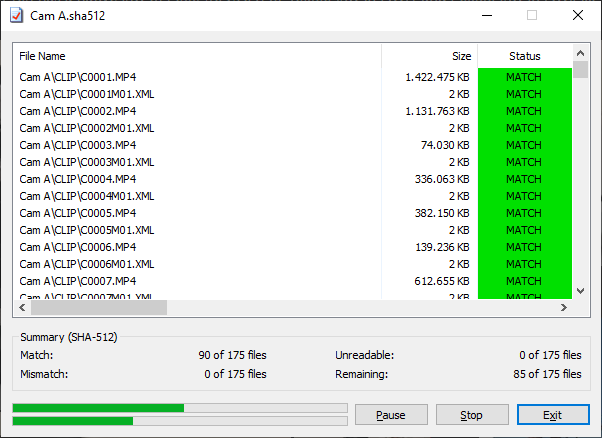
The software is very easy to use but does not allow smart management of folders and subfolders like Checksum. This is okay when sending data as it often means sending a single folder containing all the necessary files. Hashcheck makes it possible to create a unique hash file for this folder, which the recipient can check directly upon receipt.
Performances
Overview of drive cache issues
First I ran speed tests on my laptop with an Intel 7700hq processor. It has 4 cores and 8 threads, with a base frequency of 3.4Ghz and a maximum boost of 3.8GHz. The tests were carried out on the internal 256Gb SATA SSD (also being a OS disk) and on a 1TB internal 7200 rpm HDD. The hashed folder was about 52GB and was made up of a bunch of video rushes.
I quickly spotted inconsistencies in the results, such as irregularities in read speeds without the processor being fully loaded.
So I repeated the tests on my work computer, a tower that I mounted and fitted with a Ryzen 5900X (12 cores and 24 threads), boosting to 4.9Ghz single core. This time the file was 44GB. Test drives are dedicated to storing rushes, and have no applications or system files. The first one is a 4TB SATA SSD, the second is a 1TB M.2 PCIe Gen 3 SSD.
I still noticed problems and think I identified the cause: good SSDs come with some form of caching that allows them to load recently or commonly used data faster. When I performed the first speed test with Checksum on the test folder (which hadn’t been read for a long time) the average speed peaked at just 320MB/s and took 2m33s, with alternating periods of a few seconds where the disk reached only 80MB/s before rising to 470MB/s. In the second test, just after the first one and under identical conditions on the same files, the hashing only took 1m13s! HWinfo64 could not give me an average speed (display at 0 MB/s throughout the test), because the flash memory is in my opinion not read but only the data that was loaded into the disk cache. The SSD is 4TB, so the cache is big enough to load the entire 44GB folder. In the case of the laptop test, I have no idea of its cache size or usage (since the drive is also contains the OS). The drive may not have been able to load some of the test data into the cache, causing speed to drop when full and the drive to read the drive data directly.
All this to say that the laptop data shown below is to be taken with a grain of salt. Each configuration is different and requires testing on a case-by-case basis to ensure correct operation, so the results shared here cannot be extrapolated to each scenario.
Laptop performance (i7-7700HQ)
Intel 7700hq 4c/8t, 3,4GHz all core boost, 3,8Ghz single core boost.
16Go RAM DDR4 Dual channel 2400Mhz CL17
Folder containing 52Go of video rushes
Corz’s Checksum, Blake2 algorithm
| Task | Average speed – time | Limiting factor | Comments |
| HDD hashing 7200 rpm |
145 MB/s – 6m33s ( 95 % utilisation ) |
Drive read speed | |
| SATA SSD Hashing | 370 MB/s – 2m30s ( 80 and 99 % d’utilisation ) |
CPU | Uncertain result (data cached or not) |
| HDD Verification | 146MB/s – 6m25s ( 95 % utilisation ) |
Drive read speed | |
| SSD Verification | 370 MB/s – 2m32s ( 80 and 99 % d’utilisation ) |
CPU | Uncertain result (data cached or not) |
HashCheck, SHA-512 algorithm
| Task | Average speed – time | Limiting factor | Comments |
| HDD hashing 7200 rpm |
145 MB/s – 6m33s ( 95 % utilisation ) |
Drive read speed | |
| SATA SSD Hashing | 302 MB/s – 3m04s ( 60 % d’utilisation ) |
CPU | Uncertain result (data cached or not) |
| HDD Verification | 146MB/s – 6m25s ( 95 % utilisation ) |
Drive read speed | |
| SSD Verification | 515 MB/s – 1m42s ( 100 % d’utilisation ) |
Drive read speed | Multithreaded |
HashCheck, SHA-256 algorithm
| Task | Average speed – time | Limiting factor | Comments |
| SATA SSD Hashing | 208MB/s – 4m53s (40 % utilisation) |
CPU |
Desktop PC performance (Ryzen 9 5900x)
Ryzen 5900x 12c/24t 4,35GHz all core boost, 4,9Ghz single core boost
64Go RAM DDR4 Dual channel 3600Mhz CL16
Folder containing 44Go of video rushes
Corz’s Checksum, Blake2 algorithm
| Task | Average speed – time | Limiting factor | Comments |
| SSD Hashing (SATA) |
585 MB/s – 1m11s ( 0 % utilisation ) |
CPU (1c/1t at 100%) |
Cached data |
| SSD Hashing (SATA) |
320 MB/s – 2m39s ( 100 % utilisation ) |
Drive read speed | Data not cached |
| SSD Hashing (M.2 PCIe Gen 3) |
585 MB/s – 1m11s ( 25 % d’utilisation ) |
CPU (1c/1t at 100%) |
|
| SSD Verification (SATA) |
585 MB/s – 1m11s ( 0 % utilisation ) |
CPU (1c/1t at 100%) |
Cached data |
| SSD Verification (M.2 PCIe Gen 3) |
585 MB/s – 1m11s ( 95 % d’utilisation ) |
CPU (1c/1t at 100%) |
HashCheck, SHA-512 algorithm
| Task | Average speed – time | Limiting factor | Comments |
| SSD Hashing (SATA) |
500 MB/s – 1m36s ( 0 % utilisation ) |
CPU (1c/1t at 100%) |
Cached data |
| SSD Hashing (M.2 PCIe Gen 3) |
500 MB/s – 1m36s ( 21 % d’utilisation ) |
CPU (1c/1t at 100%) |
|
| SSD Verification (SATA) |
4,4GB/s – 0m10s ( 0 % utilisation) |
CPU (100 % all core) |
??? – Cached data | Multithreaded |
| SSD Verification (M.2 PCIe Gen 3) |
2,4 GB/s – 0m18s ( 100 % d’utilisation ) |
Drive read speed | Data not cached | Multithreaded |
| SSD Verification (M.2 PCIe Gen 3) |
3,8 GB/s – 0m12s ( 100 % d’utilisation ) |
Drive read speed | Cached data | Multithreaded |
TurboSFV, Blake3_2048 algorithm
| Task | Average speed – time | Limiting factor | Comments |
| SSD Hashing (M.2 PCIe Gen 3) |
3,8GB/s – 0m12s ( 100 % utilisation ) |
Drive read speed | Cached data | Multithreaded |
| SSD Hashing (M.2 PCIe Gen 3) |
2,1GB/s – 0m21s ( 100 % utilisation ) |
Drive read speed | Data not cached | Multithreaded |
| SSD Verification (M.2 PCIe Gen 3) |
3,8 GB/s – 0m12s ( 100 % d’utilisation ) |
Drive read speed | Cached data | Multithreaded |
Observations
We can conclude from these tests:
- On the i7 7700hq, the hash processing limit with blake2 is around 370MB/s compared to 300MB/s for the SHA-512. SHA-256, less suited to x64 architectures, only achieves 208MB/s.
- On the Ryzen 5900x, the CPU hash limit with blake2 is around 585MB/s versus 500MB/s for SHA-512, the blake2 algorithm is about 20% faster than SHA-512 under similar conditions.
- The algorithm chosen will not matter on the hash time for any hard drive, as their read speed is still the limiting factor even on a relatively old processor like the intel i7-7700HQ.
- Corz’s Checksum has no multithreaded mode. If you have to regularly check a large volume of data stored on SSD connected by PCIe, Hashcheck will be faster and can read saturate the disk using multiple processor cores. If you also need to generate hashes quickly, only TurboSFV can saturate a PCIe SSD with the use of Blake3, being the only multithreaded algorithm available.
In my use, Checksum remains perfectly suited because all my rushes storage drives are connected via SATA and are therefore limited to 600MB/s, very close to the hashing speeds observed on the software. These tested speeds are also the maximum possible, but in actual use where data is unlikely to be cached, the speeds will be well below the hash limits of the Ryzen 5900x and would not benefit from multithreaded operation. - Disk caches create irregularities in performance and one should be wary of their impact. In my case for example, the reading speed is halved when it is not available.
- The case of the verification on the SATA SSD by HashCheck is incomprehensible. I have repeated the verification several times with always the same result: a reading speed of 4.4 Gb/s while SATA only allows 600MB/s. The data was not loaded into RAM (10GB used out of 64GB, while the folder to be checked is 44GB) and no other disk was used.
Conclusion
What was supposed to be a simple presentation of software became much more complex as we saw the disparities in performance on different types of disks. It is important to test these programs well in your own conditions on your selected hardware and not just rely on the figures presented here. It is very hard to find information on the size of disk caches or the performance of microcontrollers in data management. In addition, each manufacturer has its own algorithms, and drives of similar appearance could have very disparate performance especially when writing/reading very large volumes of data.
I hope that these two articles have been useful and that they provide a good introduction to the issues and problems raised in the management and the verification of data integrity.